# Work Management
# Work Dashboard
The work dashboard provides users a fast and flexible way of viewing their workload. It’s built from the ground up and designed for speed.
Using the work dashboard end users can:
Access the default views (Assigned to Me, Unassigned, Available Work, Queue History and Work History)
Select display mode (List or Detail)
Create and manage personal views
Manage custom columns of personal views
Question Data
Core Data (Queue Name, Order ID, Request ID, Workflow Id, Action Name)
Save personal views
Apply filters
Filter views across multiple queues
Perform keyword search across all columns
Use smart search filters against a specific column from search bar (1 only)
Export to excel
Toggle full screen
Set Alternate Actor
Access Task Re-assignment
Quick approve/reject approval actions
Assign work individually and in bulk (Queue permissions permitting)
Pick work items individually and in bulk (Queue permissions permitting)
Act on work items in bulk based on action types and relevant options for the work items. See “Bulk Work” for more details
Queue managers can perform all the above, as well as:
- Access the Queue Management screen
Catalog and System admins can perform all the above, as well as:
- Create and manage global views
# Bulk Work
Bulk actions enable work dashboard users to select multiple items and act on them at once. There are four pre-requisites for performing actions in bulk:
The actions must be assigned to the current user
The actions must contain a common output
The actions must have Direct Work enabled
The Status Filter of the view must be set to Active
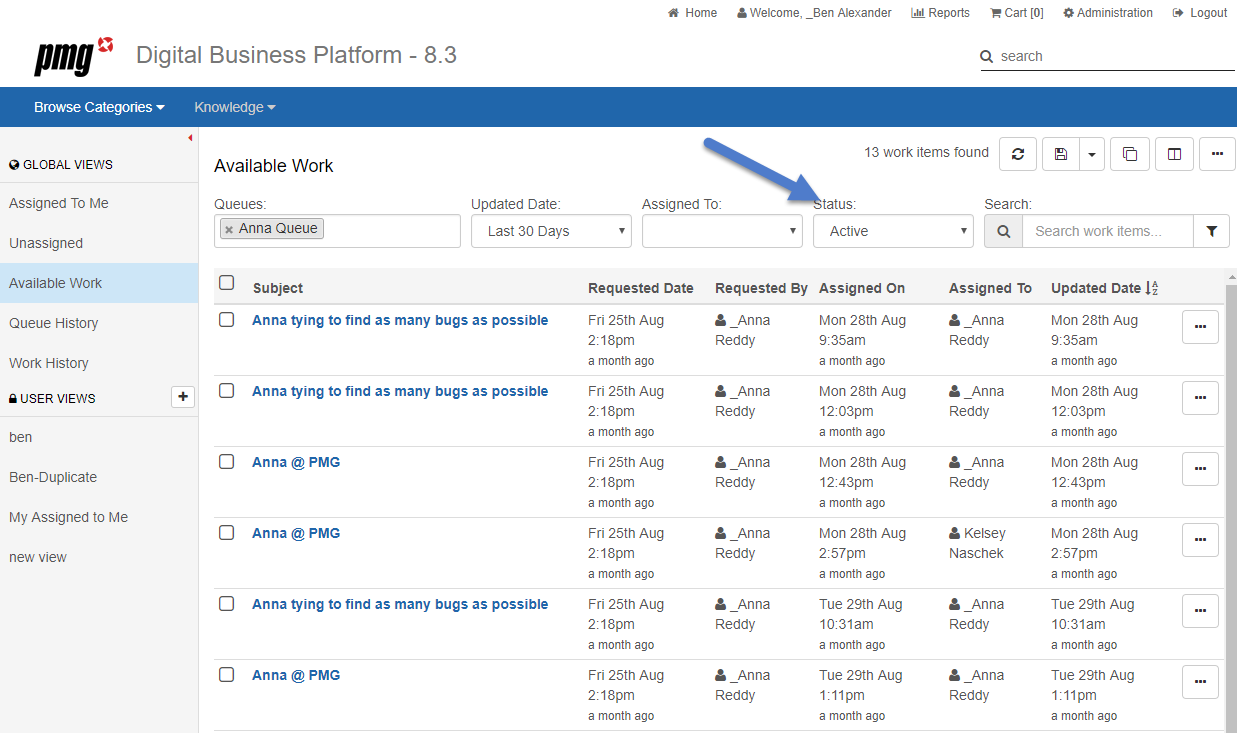
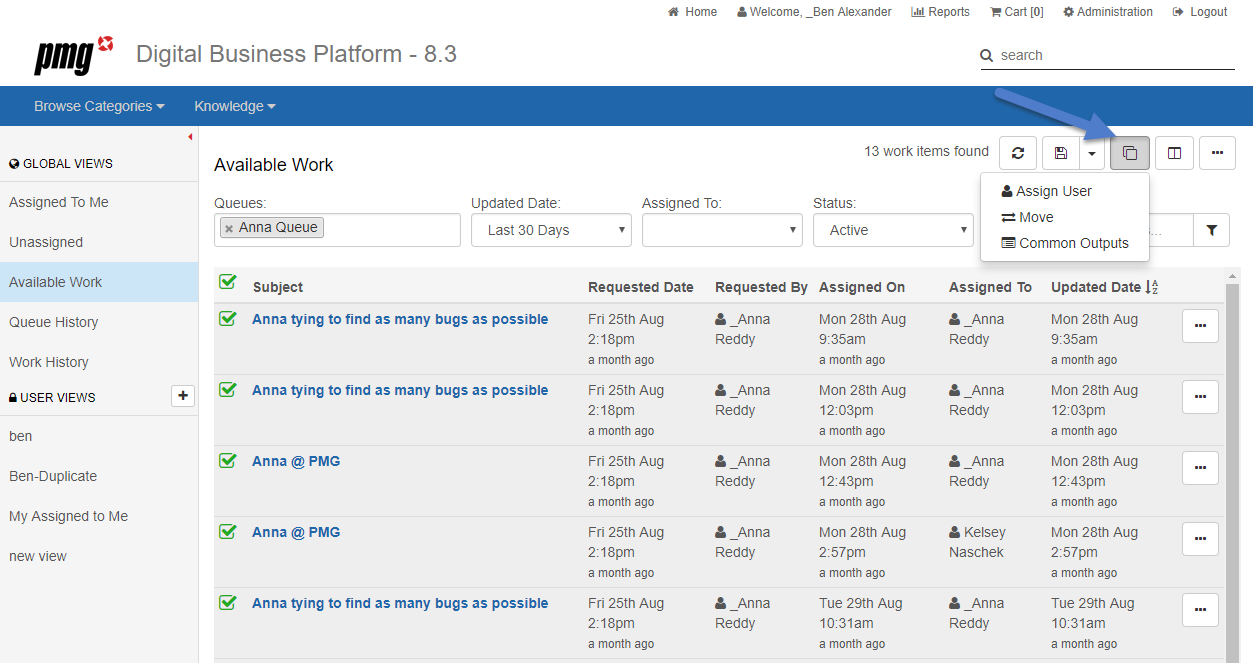
To perform Bulk Work from the Work Dashboard, select work items assigned to the current user, select the Bulk Work icon, and Common Outputs. Select the output to follow, optionally add comments, or select cancel.
# Access the Default Views
There are five default Global Views: Assigned to Me, Unassigned, Available Work, Queue History and Work History.
# Select Display Mode (List or Detail)
There are two different display modes, List or Detail. By default, the list view is displayed on load. This displays all your work items as a list, with the ability to see more data as columns. Detail mode shows fewer columns but allows you to preview and act on work items in the same screen.
# Create and Manage Personal Views
There are three ways to create a new view. Either by selecting the "New" button from the Views panel, by saving a Global View as a new view, and by saving a User View as a new view.
Users will be able to modify and save changes to columns and filters of Personal views, while only admin users will be able to modify and save changes to Global Views.
Users also can delete personal views by selecting the Menu icon, then selecting "Delete View" and confirming that they do in fact want to delete the view.
# Manage Display Columns of Personal Views
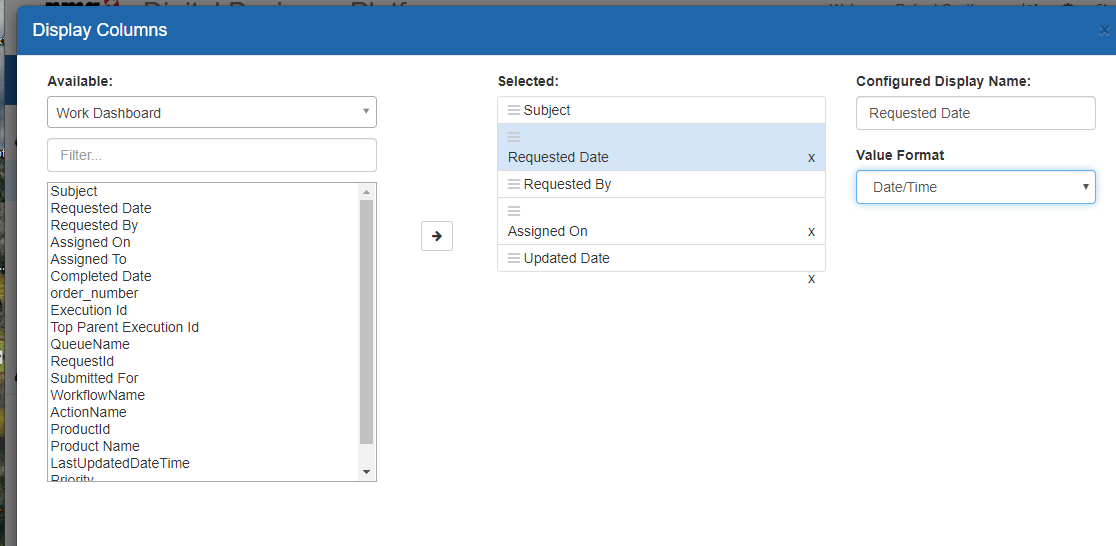
Users can modify the columns that appear in their personal views. From a user view, select the Menu icon, then select "Display Columns".
From here, users can select from Work Dashboard data (things like work item subject, request date, order number, queue name etc.) and add them to the view. User can also select from Service data, if the service reporting configuration has been set up. Users can re-arrange display columns by dragging and dropping or remove columns by selecting the x icon. Additionally, users can modify the display name by selecting the column, then editing the Configured Display Name. Once saved, the view will be updated to reflect the changes. Fields containing date values may be set as Date/Time Value Format which provides better sorting and filtering for these values.
# Save Personal Views
Changes to personal views can be saved by hitting the green save icon. Additionally, changes can be saved as a new personal view by selecting the drop-down icon next to the save icon and selecting Save As…
# Apply Filters
There are quick filters across the top for Queues, Requested Date (Today, Last 7, Last 30, Last 60, Last 90), Assigned To (Me, Unassigned, Me or Unassigned, Anyone), Status (active or complete).
# Filter Views Across Multiple Queues
To filter a view across multiple queues, select the queues you are interested in viewing from the Queue filter. To remove a queue from the view, click the x next to the queue name.
# Perform Keyword Search Across All Columns
To keyword search across all columns, simply enter your search text in the Search: box, then hit enter on your keyboard.
Use smart search filters against a specific column from search bar (1 only):
Alternately, you can use smart search filters to search a specific column from the search bar. Enter your text in the Search box, then select the filter icon, and the column from the drop down.
# Apply Advanced Filters
To apply advanced filters, select the Advanced Filters icon, then configure your filters. Keep in mind that additional rows will be cumulative.
# Export to Excel
To export to excel, select the Menu icon, then select "Export to Excel". This will export the current views data to an excel spreadsheet.
# Toggle Full Screen
To toggle full screen, select the Menu icon, then select, "Full Screen Toggle". You can toggle back to the original view by following the same method.
# Set Alternate Actor
To set up an alternate actor, or manage existing configurations, select the Menu icon, then select "Alternate Actor". End users will see and manage the Alternates they have set up for themselves, while admins are able to see and manage all alternates in the system.
# Access Task Reassignment
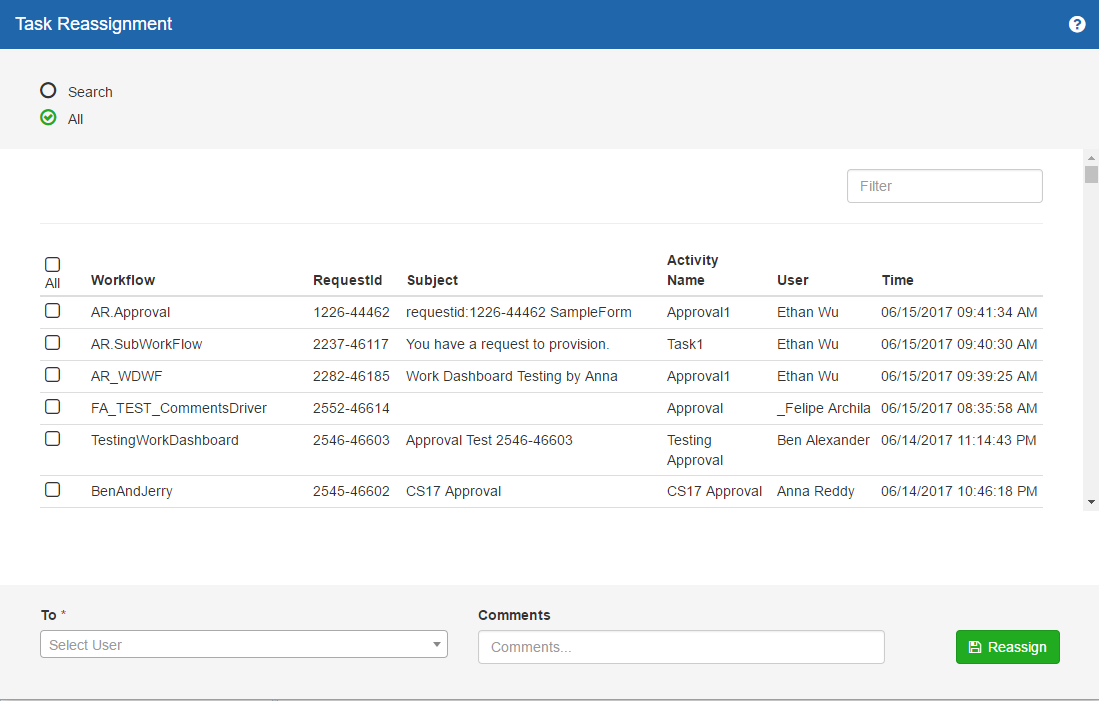
To re-assign tasks from one user to another, select the Menu icon, then select "Task Reassignment". Non-admin users (permissions permitting) will have the ability to reassign their tasks to another user, while admins can select both the user to move the work from and the user to move the work to.
# Quick Approve/Reject Approval Actions
On eligible approval actions, the "Assigned To" dropdown will have options to "Approve" or "Reject". In order to use this feature, the Approval action must be configured to allow Direct Work. You can even Approve/Reject work items that aren't directly assigned to you but are in a queue you are a member of. For example, if this work item is assigned to Anna, however I know it can be Approved, and I am an appropriate alternate approver because we are both members of the Approval Queue it was sent to, I can select "Approve". This saves the step of reassigning the work to myself in order to approve.
# Pick Work Items Individually (Queue Permissions Permitting)
To pick work individually, select an item that is not yet assigned, then select "Pick Work". Alternately, you can use the pick icon once a work item is opened.
# Bulk Work
When a single queue is selected, the B icon appears representing Bulk work. Users have two options, to pick work in bulk or assign work in bulk (queue permissions permitting).
To assign work in bulk, select the work items that you want to assign, then select the Bulk Work icon, and Assign Work. Select the user to assign the work to, then select Save and Close.
# Access the Queue Management Screen
To access the Queue Management screen, select the Menu icon, then select "Queues".
# Create and Manage Global Views
# Alternate Actor
Use this feature to configure work delegations from one user to another during a specified window of time. By using the Alternate Actor functionality, work can continue moving forward when people are out of the office, without an administrator having to manually reassign tasks. By using the "Show Admin View" option on the primary Alternate Actor screen, administrators can view and manage alternate actor configurations other users have set up and can thereby see how it is being used across the environment.
From this screen, users can manage their existing alternate actors or create a new one. Admins can configure alternates for other users, while non-admin users are only able to define alternates for themselves.
To add a new alternate actor, select the “Add” button at the bottom left of the screen. Select the user the work should be delegated from, and the user the work should be delegated to. Either select an individual workflow, or “**all workflows**” from the Workflow dropdown list. Select a reassignment type (either Share or Reassign). Optionally, select a date range for the delegation to occur or leave blank for no date range to be enforced.
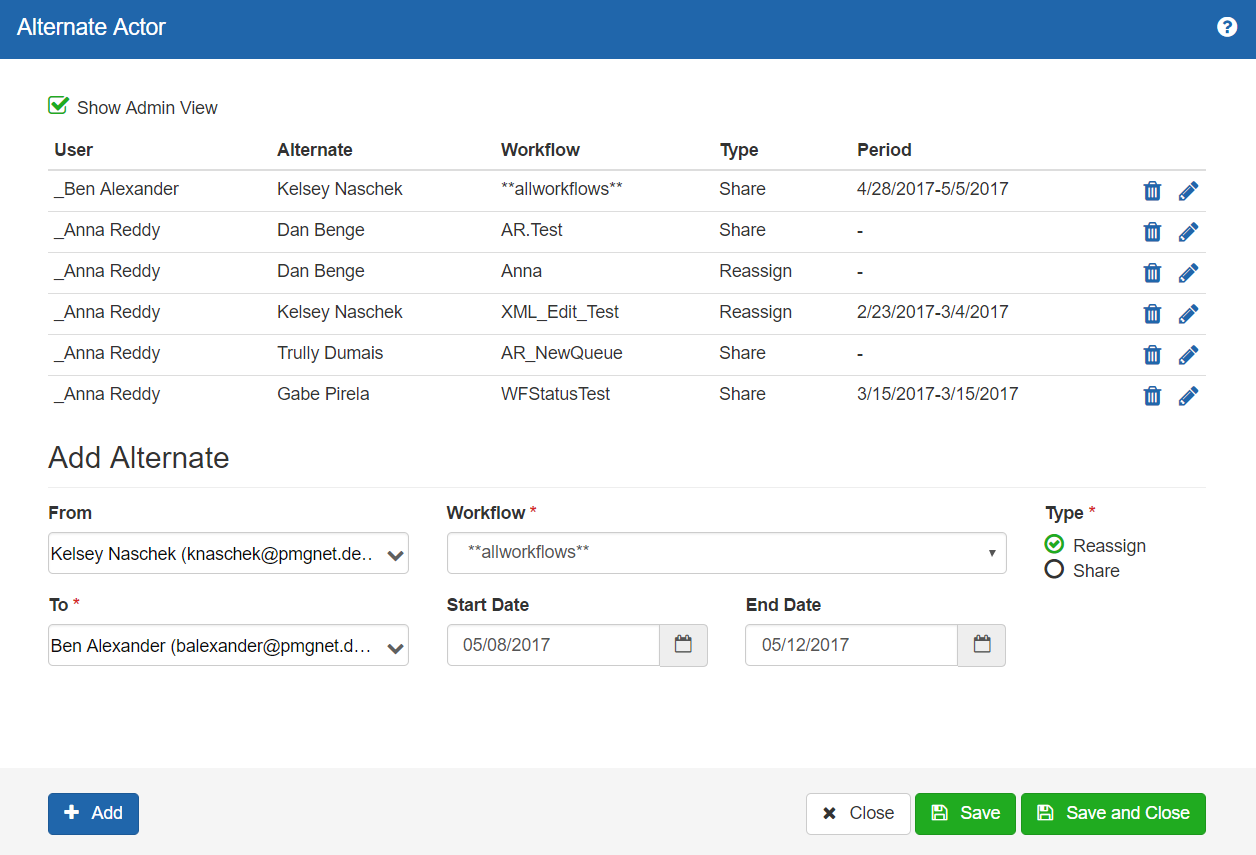
The two delegation types are as follows:
Share – A copy of the work is sent to the specified person's in box, so either the original person or the delegate can act on it.
Reassign – Any new human activities coming to this in box will be forwarded to the person specified instead. The original assignee will not see it at all and will not be able to act on it.
In particular cases (i.e. particular work items) where you do not want work to be able to be reassigned or delegated, you can remove the capability on a case-by-case basis in your workflow by setting the "Alternate Actor Allowed" action property to "No" on the relevant human activity.
# Task Reassignment
Use this feature to reassign work from one user to another. Admins will have the option to select the originating user from a drop down list, while non-admins will only be able to reassign their own work. Additionally, admins can select to return the 100 most recent task assignments by selecting the “All” option.
To reassign work, select the user the work should be coming from. The list of their work items will appear below. Select one or more work items to move. Select the user the work should be assigned to. Optionally, enter comments, then select the “Reassign” button.
# Work Item Access
The PMG Platform provides multiple models to support remote access to work items. Through configuration and network layer topology configuration, remote access to work items via mobile devices or remote computers is supported.
The below describes the options available.
# Terminology
# Work Item
A work item is a human action (approval, task, choice, etc.), defined within PMG workflow, which is directly assigned to an individual via the workflow engine. A single workflow human action may be assigned to multiple individuals or queues at any given time. As a note, work which is assigned to a queue is not yet technically a work item, as it is not assigned to one or more individuals who can progress the work. A work item is typically comprised of a “Subject”, “Body”, “Outputs”, a Work Log, and a work item form, which allows for additional data presentation or information collection features for the assigned user.
# Work Item outputs and progression
Work item outputs are the selectable options provided to a work item recipient. Approval tasks provide “Approve, Reject”, while tasks and choice actions provide configurable outputs. A work item recipient progresses a work item by selecting one of the provided work item outputs.
# Work Item Form
The work item form provides for a rich web based form interaction for a work item recipient. The forms typically provide detailed information about a request, and can also provide rich form based interactions to the user to collect additional information from the assigned user.
# Work Item ID
Each distinct assignment of a work item to an individual recipient is assigned a distinct Work Item ID, which is a GUID.
# Work Item direct response
A direct response for a work item describes a process by which the work item recipient can progress a work item by selecting a work item output directly, effectively bypassing the detailed work item view, and any related information such as the work item form.
# Work item access methods
Work items may be accessed by the following available methods
# Web Work List
Web Work List provides a Web based interface to a user for all work, both queue based and directly assigned work items. The Web Work List is typically accessed via browser by a link provided within the Portal.
# Web links
Web links can be made available to a user to interact with work items, by email or other applications. Options for the web links are described in more detail below.
# Web link to directly progress work items
This method provides the very simple “Click to approve/reject/etc.” option. Web Links are typically provided within the body of email notifications sent to users. These links, however, may also be rendered in other applications or leveraged by other systems.
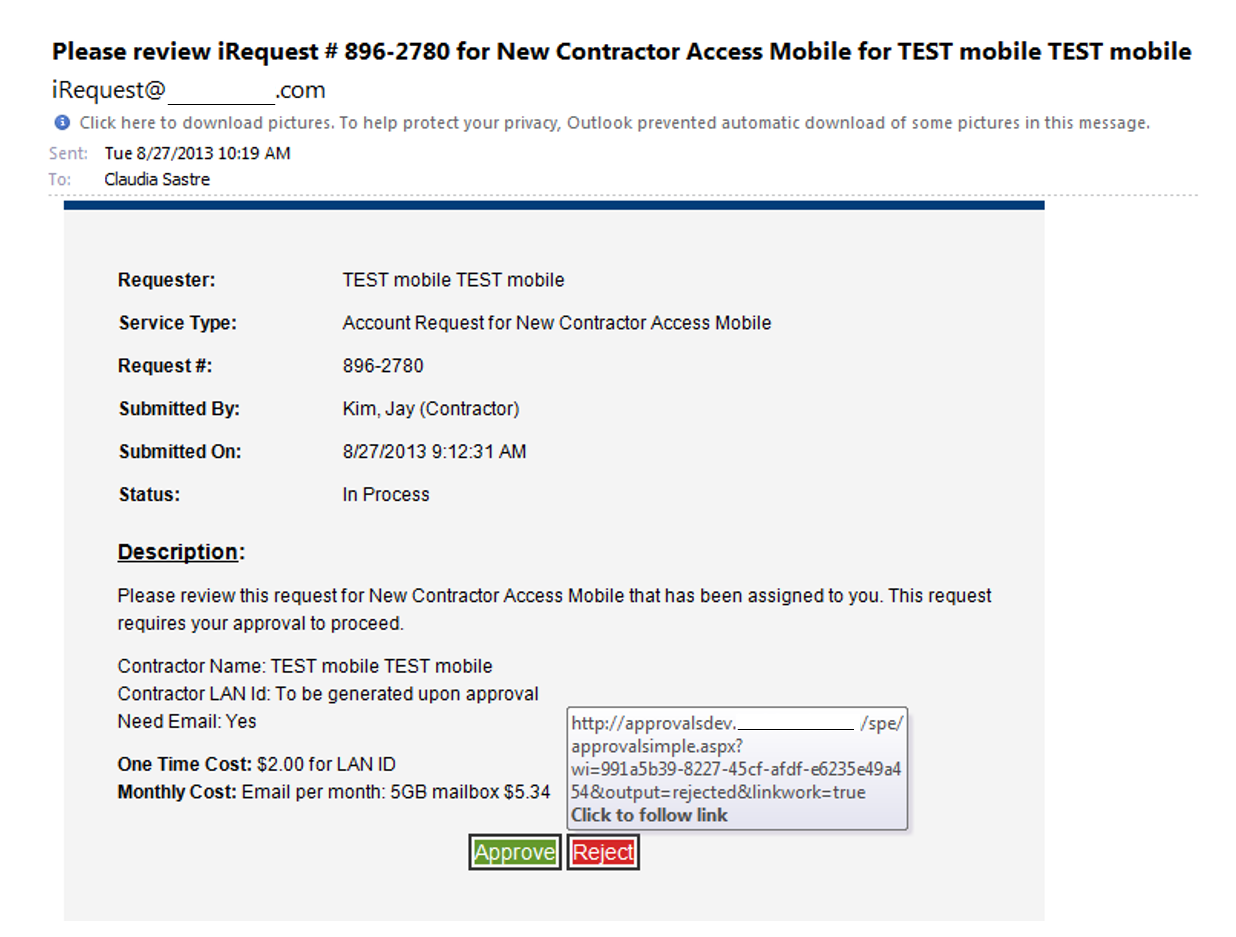
Often these links are displayed as “Click to approve” or similar. The links may also be configured to represent graphical buttons, i.e. Green “Approve” button, Red “Reject” button. This model supports progression of work for work items which require no further interaction by the user progressing the work, e.g. other than to review the email contents and to progress the work item by selecting the provided link(s).
# Web link to view work item details
This model provides the opportunity to notify the user of the work item and allows the user to directly link to the full view of the work item, where the user can see the full work item details and interact with the work item form provided prior to progressing the work item.
# Web services
The PMG suite provides a set of web services which provide access to the “direct work” feature of work items. See the PMGSPEWS API documentation for additional information.
# Methods to send emails to work recipients
Email messages can be delivered to work by directly attaching an Email Communication action to a human action using the “Send to Work Assignees” option.
Application links to support “direct work” will consider the following parameters in the web link.
Input Parameters:
wi – Required, the work item ID, [WI_WorkItemId] for usage within emails
linkwork – a Boolean value, if true this allows the user to submit the work item with a direct work item link (direct work needs to be allowed for the action for this to work)
output – The text label of the output to follow from the assigned work item in the workflow
comment – Comment for the submitted work
The email action method can use email templates which are files containing the structure of the email message to be sent. When using the email actions, the value ‘<%#EmailGUID%>’ will be replaced in the template with the relevant ID for the work item. An example of a full link is as follows:
[applicationURL]/spe/ApprovalSimple.aspx?ei=<%#EmailGUID%>&output=Approved&linkwork=true
This link will select “Approved” for the recipient for a related Approval action. The ‘linkwork=true’ parameter is optional but a helper indicator that this work item is intended to be worked directly vs. requiring the user to view the work item details. Fixed comments may also be injected into the output for the user with the following parameter as an example
comment=1+star
When using the Email action to deliver work, the value [WI_WorkItemId] will be replaced with the relevant work item ID. An example of a link to approve via the email action is provided below.
<a href=" G/spe/ApprovalSimple.aspx?wi=[WI_WorkItemId]&output=Approved&linkwork=true" class="btntxtgreen" title="Approve">Approve</a>
The available application direct work files are in the installation folder for the PMG Web Application under:
[PMG IISFOLDER]\sc\Themes\WWLWorkItem\WorkItemTemplates\
# Inventory of remote access URLs
| /sc/WorkItemView.aspx | Rich web view of individual work item, 7.3+. This view supports customizable template work item views with rich forms support (show/hide) |
|---|---|
| /spe/ApprovalSimple.aspx | View of individual work item for Approval, supports direct work |
| /spe/ChoiceSimple.aspx | View of individual work item for Choice, supports direct work |
| /spe/TaskSimple.aspx | View of individual work item for Task, supports direct work |
| /spe/ChecklistSimple.aspx | Legacy support file. Older versions are converted to support legacy checklist actions. Checklist functionality is replaced with the use of a Choice action and a shared form. |
| /spe/InformationSimple.aspx | Legacy support file. Older versions are converted to support legacy Information actions. “Information” functionality is replaced with the use of an email action. |
| /spe/WorkItemTemplates/ResponseReceived.html | Optional HTML template to render for response received messages. This file is processed by ResponseReceived.aspx and may contain workflow values (variables, contents, etc.) |
| /spe/WorkItemTemplates/ResponseReceived.[LOCALE].html | Optional localized html template to use for localization support. The file name can contain the language-region reference to be matched with the end user browser preferences, e.g. en-us, fr-fr, etc. |
| /spe/ResponseReceived.aspx | Optional file to override the default response display message. This file will parse the template WorkItemTemplates/ResponseReceived.html or the localized version as available. See below for overriding the response received default display. |
| /spe/WorkItems.aspx | WWL1 (retired) |
# Custom Work Item Templates
The application stores the default view of work items using the template file located on the application server web folders in the below file. This file should not be modified, as it will be overwritten during upgrades. This file can be replicated and modified for specialized work item views.
\inetpub\wwwroot\PMG\pmgsc\Themes\WWLWorkItem\RequestInformationTemplates\Default.html
To globally override this layout file, duplicate into a new file as below and make any modifications.
UserDefault.html
The application will cache the prior file and will need to either be recycled manually or wait until the cache recycles.
Additionally, more specific layout overrides can be performed by creating additional files using the below syntax.
workflowName + "__" + actionName + ".html" : scopes the template to be used for a specific workflow and action name
"__" + actionName + ".html" : scopes the template to be used for all workflows and specific action name
workflowName + "__.html" : scopes the template to be used for all actions with specific workflow name
# Overriding the response received default display
The display rendered to users who progress work with the remote access method can be overridden with the following files:
\inetpub\wwwroot\PMG\spe\WorkItemTemplates\ResponseReceived.html

\inetpub\wwwroot\PMG\spe\ResponseReceived.aspx

\inetpub\wwwroot\PMG\spe\ResponseReceived.aspx.cs (This file
contains source code to custom develop an override display process,
however this file may be replaced by an upgrade process)
An example template for the ResponseReceived.html is below.
<!doctype html>
<html>
<head>
    <meta charset="utf-8">
    <title>Received response for [%#Content.Request.Request Id%]</title>
    <meta name="viewport" content="width=device-width, initial-scale=1">
    <style type="text/css">
        html {
            font-size: 100%;
            -webkit-text-size-adjust: 100%;
            -ms-text-size-adjust: 100%;
        }

        body {
            font: .8em/1.5em Verdana, Arial, Helvetica, sans-serif;
        }

        .link {
            color: #d62828;
            cursor: pointer;
        }
    </style>
</head>
<body>
    <p>Thank you, your response was recorded for request [%#Content.Request.Request Id%]. <a class="link"
            onclick="window.close();">Close window</a>.</p>
</body>
</html>
# Establishing URLs for mobile access
When configuring access via web links for work item recipients, the provided link must be accessible by end users based on their network connectivity, i.e. will the user be on an internal network or external network, and will the provided link be resolvable by the end user’s device. Additionally, consideration should be made as to whether the user will be authenticated to the PMG application.
In the case that multiple environments are established (Sandbox, Development, User Acceptance Testing, Production, etc.), each instance should have its distinct URL established.
For example:
DEV: http://DEVPMG.companyname.com/spe/approvalsimple.aspx
UAT: http://UATPMG.companyname.com/spe/approvalsimple.aspx
PROD: http://pmg.companyname.com/spe/approvalsimple.aspx
# Network topology options
For PMG Platform implementations where the application is hosted within a private network, work item access can be made accessible to end users with the following options.
# Reverse proxy
The reverse proxy model implements a reverse proxy provider to allow access to one or more parts of the internal application services. The reverse proxy is configured to allow Internet based users access to the web links listed above to support the interaction with and progression of work items.
When implementing reverse proxy access for remote approvals, the following resources should be made available:
/sc/spe.link.asp
/sc/js/js_combined.asp
/spe/ApprovalSimple.aspx
/spe/js/functions.js
/sc/favicon.ico
# Remote access relay
PMG provides a remote access relay application which can be placed on the open Internet, or within a client’s DMZ. The remote application provides a bridge for work item interaction for Direct Work items. The remote access relay can be configured with access to the internal PMG Platform which allows for real time interaction and confirmation for remote users. Alternatively, the remote access relay can transmit the user response as an SMTP email message delivered to a special email address which may be processed through a configured workflow for pickup and dispatch to the internally awaiting workflow actions. See ADDENDUM: Remote access relay application configuration.
# Configuring Remote Work Items
# Environment Contents
Create new environment contents to store the values for the base URL and the approval links:
| Name | Example |
|---|---|
| baseURL | http://approvalsdev.company.com |
| DWApproveButtonMobile | <a href="G/sc/ApprovalSimple.aspx?wi=[WI_WorkItemId]&output=Approved&linkwork=true" class="btntxtgreen" title="Approve">Approve</a> |
| DWRejectButtonMobile | <a href="G>/sc/ApprovalSimple.aspx?wi=[WI_WorkItemId]&output=Rejected&linkwork=true" class="btntxtred" title="Reject">Reject</a> |
# Work item access options
Configure the human actions with the correct permissions as desired to support remote access. The “Direct Response Allowed” property provides options for remote access. Direct Response should only enabled for work items which do not require the user to interact with the work item form.
Set the property “Direct Response Allowed” with any of the following options:
 Yes – With authentication: The work item may
be progressed directly by web link without the user viewing the
entire work item details. The user must provide valid credentials
for the direct work approval. The application will challenge the
user with integrated windows authentication, form logon, or extended
logon based on the application configuration. If the user is not
currently authenticated to the network, and IWA is in place, the
user will receive a browser based IWA challenge pop-up for network
credentials. NOTE: Authentication is not supported with the remote
access proxy application.
Yes – With authentication: The work item may
be progressed directly by web link without the user viewing the
entire work item details. The user must provide valid credentials
for the direct work approval. The application will challenge the
user with integrated windows authentication, form logon, or extended
logon based on the application configuration. If the user is not
currently authenticated to the network, and IWA is in place, the
user will receive a browser based IWA challenge pop-up for network
credentials. NOTE: Authentication is not supported with the remote
access proxy application.Yes – Without authentication: The work item may be progressed directly by web link without the user viewing the entire work item details. The user is not required to provide credentials to progress the work item. This option is required for the remote access application.
A sample email sent would look as below.
